If you’ve had your Jeep for a while without doing any upgrades, then installing ARB differential covers can be a wise upgrade that you can try doing yourself. No one wants to take their Jeep out to do some rough trail riding and run into issues with the terrain. With all of the different terms such as the axle vent breather, rear-end vent breather, and differential vent, it’s easy to get confused, but this is a modification that you’ll definitely want to try if you love taking your Jeep for heavy offroading adventures.
ARB has been making parts for four-wheel-drive vehicles for decades. Initially, it was for the people ripping around some of the craziest terrains you can get your hands on over in Australia. Now, you’re able to find ARB parts all over the place, and no matter where you go, the quality will always be high.
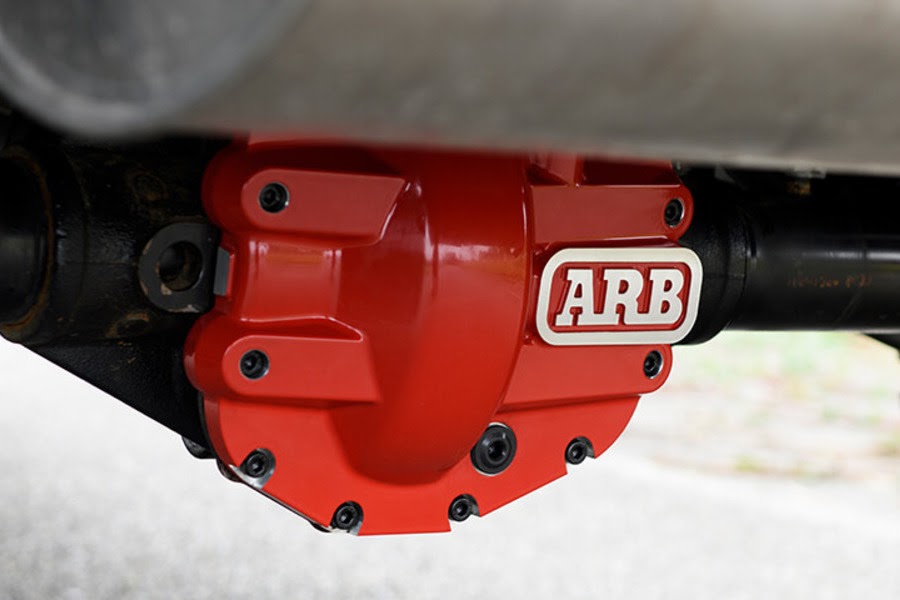
ARB knows what’s required to keep a vehicle running in tip-top shape, and they show it by their selection of parts available for modifying your vehicle. One very common product that ARB boasts is a cover in front of the differential housings on Jeeps. This cover is very important for Jeep owners because, behind the cover, there are a bunch of expensive parts that you don’t want to repair in the future.
No one wants their differential covers smashed into the ring gear by a rock that comes out of nowhere on some back-road trail, especially if you’re in a location that’s nowhere near civilization. Many times, the rock doesn’t even need to hit it very hard to cause any damage.
When you’re out trail riding, sometimes damage to the differential might be a little more difficult to notice, but it tends to happen quite a bit. You might not notice it unless you happen to spot some fluid leaking out of that particular area.
If you’re into offroading with your Jeep, getting differential covers should be an upgrade that’s nearing the top of your list. After you do the differential cover upgrade, you can take your Jeep out to the trails with an added peace of mind in knowing that nothing will get busted out there while you’re driving. This will increase your overall satisfaction when offroading because you’ll be able to be a little more daring out there.
ARB Competition Differential Covers have a magnetic dipstick that will allow you to see how much gear oil you have very easily. The aftermarket cover also has a magnetic drain plug so that tiny magnetic objects won’t have a chance to infiltrate the oil. This is a nice bonus because not a lot of aftermarket covers have these little perks.
The covers are made from very durable and strong nodular iron. The bracing is also designed in an H formation to provide increased durability when put under duress. Sometimes people purchase this upgrade but then keep putting it off and doing other upgrades before it.
Factory differential vent tubes create an excess amount of heat when you drive. If you happen to all of a sudden drive over some cold water, the instant variation in temperature can result in a weakening of the seals.
If you’re out off-roading over terrain that contains some areas with deep water, then the vents can turn into an issue if they are going to be submerged at any point. The vents aren’t situated very high off of the ground, and unless you’ve raised your Jeep’s height, problems can occur.
If water makes its way into the differentials, there’s a chance that some pretty pricey parts can be at risk of damage. Water getting in that area can also reduce the lubrication of the ring and pinion and carrier bearings.
The manual and automatic transmission both have breathers that contain a splash-resistant rattle cap. When you’re driving through water, there is a risk of damage if the water manages to find its way into certain areas, and damage can happen to your vehicle well before you’re even aware of it.
Differential Breather Kit Upgrade
You can purchase either one or two differential breather kits for the vehicle. You’ll want to mount the breather in the correct positions, keeping in mind both breather lines shouldn’t have any dips throughout the entire length of them. If there are any dips in them, fluid can get trapped inside them, and that would prevent the breather from doing exactly what it’s supposed to do.
If you’re going with two, then one differential breather kit will be running in the front, and the second differential breather kit will be for the rear differential.
ARB parts have lines/fittings that are pretty comparable to air-locker lines, but they have a diameter of 8mm instead of the 6mm diameter.
What Tools Do You Need For The Differential Cover Replacement?
Before you get started, there are a bunch of tools that you’ll need:
- 13mm socket
- ⅜” ratchet and short extension (this is used for the removal of the drain plug)
- 8mm hex key
- ¼” hex socket
- Low range torque wrench (the range should be 15-26ft/lb.)
- Gasket scraper
- Die grinder with Scotch Brite pad (this isn’t absolutely required, but highly recommended to make things easier)
- Creeper
- Drain pan
- Cardboard (this is used to keep spills off your concrete or driveway)
- Funnel
- Chainsaw file (a rat tail file or knife will work for making a mark on the dipstick, as well
- 5 quarts of gear oil for the axles (you might need slip additive, but check your manual for further information)
- Lubelocker differential gaskets (high temp RTV sealant could work if you don’t have lubelocker differential gaskets)
- 8mm socket
- 13mm box/open end wrench
- 14mm wrench
- 14mm deep socket
- Medium sized circle nosed pliers (grabbers)
- ⅜” drill bit
- 5/16” drill bit (a drill bit stop collar isn’t required, but highly recommended)
- Electric drill (a drill press works, too)
- Flat file
- Hacksaw
- Bench vice
- Diagonal cutting pliers (tubing cutter works if you don’t have diagonal cutting pliers)
- Compressed air and blow gun (basically just something you can use to clean the lines out with)
- Plumbers contact cement in the proper range of temperature
To add in the transmission and transfer case breathers, you’ll need:
- Two VIAIR 90001 ¼” NPT male to ⅛” BSP adapters
- Two ¼ NPT female to 3/8” hose barb adapters (you can find these at your local plumbing supply store)
How To Do The Installation
You’ll want to start by taking off the drain plug from the differential housing. You’ll be using your 3/8″ ratchet/extension for this step. For the rear one, it’ll be the tiny little square on the front part of the housing.
The fluid will begin to drain after you remove the drain plug. You’ll see a wiring harness sitting near the rear lockers with a wiring bracket that’s sitting above the differential. You won’t be using that bracket again.
Once the fluid slows down, you’ll use your 13mm socket to take out 10 bolts. Ensure that you leave one of the bolts still threaded loosely so that the cover won’t slide right off.
You can now take off the rear cover by prying it off. If you’re not able to pry it off, you can use a rubber hammer or mallet to tape it off.
At this point, you might notice chunks of sealant on the surface of the differential housing. To get all of those chunks of sealant out of the way, use your gasket scraper.
After that, get your die grinder and a Scotch Brite pad to grind off any other debris. By now the seal should be nice and free.
There will be a bunch of wrapping around the product because of how it’s shipped. There should also be a package containing hardware and all of the instructions for it.
It’s nice that the dipstick and the cover drain plug have magnets on them so that any small metallic debris will be captured from getting into the oil.
The differential cover you’ve purchased might have a different fill level in comparison to some of the other ones on the market. You’ll want to make a little mark on the dipstick to ensure it’s filled to the correct level. In order to figure out what fill line to use, you’ll take the factory cover and the ARB cover and put them beside each other. Get a straight edge so that both are aligned properly. Sit the dipstick in the fill hole of the ARB cover to see how far the dipstick will go in, ensuring not to thread it in during the process.
At this point, you’ll want to get your chainsaw or rat-tail file to mark exactly where the oil level should be filled to. Once you’ve done that, you can pop it in the fill hole and double-check if the level works properly.
Get your 3/8″ ratchet/extension and install your drain plug back into the factory hole. You’ll also want to put the drain plug on the ARB cover in place using your 8mm hex key. A socket also works if you don’t have a hex key.
If you don’t want to use RTV sealant on the differential covers, you can just reuse your Lubelocker gaskets. RTV sealant is known to be cheaper than Lubelocker gaskets, but it’s also known to cause much more of a mess in comparison.
If you notice a big mess from the RTV sealant, do a good job cleaning all of it up so that it’s not gumming up the bolt holes on the differential. RTV sealant can create some squish that will just make the process more frustrating.
Before you proceed, lay everything in closely in front of you. A couple of initial bolts are going to be installed as you’re holding much of the weight of it, so having things close to you makes this process go much more smoothly. Another tip here is to have the gasket situated properly over the cover so that you’re aware of what way it’s going in.
Use your hand to get the first few bolts started. Once they are threaded a bit, you can use your 1/4″ hex key to start tightening up the rest before you’re ready to start torquing them in place.
The Lubelocker gasket packaging will display a criss-cross pattern formation of how to tighten the bolts. The initial torque will be set to 15/ft/lbs, and the final torque setting is at 26 ft/lbs.
The front cover installation is very similar to how it was taken off, minus the part where the drain plug is located. You might find it a tad difficult to reach all of the fasteners due to the front track bar getting in the way.
One thing to note here is that the front cover will have a fill hole that’s lower down in comparison to the rear one. You might be able to get away with not having to mark your front dipstick.
Now, you’ll be using the dipstick port in order to fill up the differentials with the proper gear oil for your particular vehicle. Some vehicles will take around 2.5 quarts for the rear and 1.5 quarts for the front, but that all depends on your vehicle. The overall capacity of gear oil you’ll want to use will be a hair over what the factory specs are. Ensure you’re using your dipstick so that you don’t add too much or too little. For those that have a Trac-Lok axle in their vehicle, you’ll want to put in some slip additive.
Getting To The ARB Differential Breather Kit Installation
When you get to this point, you might have to stray away from the instructions a little bit. Some people like to purchase new fittings to make the process go a little more smoothly. To bond both fitting halves together, using the plumber’s contact cement will work the best. It takes about a full day for it to cure. After it has finished curing, you can sand it and paint it without worrying about it falling apart. You can use other sealants, but the plumber’s contact cement just seems to be the strongest method.
The differential vent on the front is a press fit, and the rear one will be threaded inside the tube of the axle. The ARB vent kit comes with fittings that are 1/8 BSP (British Standard Pipe). A lot of Australian and European four-wheel-drive vehicles use this type of measurement. As a result of the different measurements, they won’t accurately thread into the front or rear differential.
If you have a micrometer handy, you’ll notice that the flat area is nearly 5/16″. At this point, you’ll need to modify each fitting to a press fit.
To do this, you need to place the ARB fittings in a vice and slice them with a hacksaw. If you have a cut-off wheel, that could also work. You might notice a bit of debris left behind, but that’s normal.
Loosen the vice and then position the fitting vertically back in the vice.
Ensure that you’re not drilling anywhere past the hex part of the fitting. If you do, you run the risk of damaging some of the mechanical parts inside of it. If you have a drill stop, then consider using that so you don’t run the risk of going in too deep and damaging anything. Once you’ve finished drilling, get your flat file and use it to file the top portion of the fitting.
Get the plumber’s cement again and apply a very thin portion of it on the shoulder of the fittings. After a few minutes, push the two fittings together and let them sit for a full day. If you don’t wait for a full day, you run the risk of the fittings not curing together, which means you’ll have to repeat the entire process over.
After the curing process, the fittings should be ready for installation on the differentials.
You’ll now want to decide where your breather manifolds should be situated. Some people like to drill them into the plastic bracket located under the hood area of the vehicle. This location is an ideal spot for the transfer case breather, the transmission, and the front differential. The rear one can be placed near the back of the tail light on the passenger side of the vehicle.
ARB includes screws in the kit that can be used to install the breather manifolds.
Get your 13mm wrench and then install three push-lock fittings. After that, install a plug with an o-ring with the 3mm hex key. Get the applicable drill bit size and then drill two separate holds in order to mount the manifold at the front.
The transmission and transfer case breathers are fairly tricky to find, and they have green caps to make finding them a bit easier. If you’re unable to locate them, try taking a look behind your intake manifold near the passenger side of the vehicle. Sometimes it’s located in that area. For the transfer case, try looking near the firewall located behind the dipstick tube for the transmission. It might take some time to find depending on the vehicle.
You’ll need to exercise some patience during this step because accessibility of the transmission and transfer case can be frustrating and tedious unless you’re completely removing them. You can extend the lines all the way to the ARB manifold instead of fully replacing the length of them.
At this point, you’ll now need these two things:
- Two VIAIR 90001 ¼” NPT male to ⅛” BSP adapters
- Two ¼ NPT female to 3/8” hose barb adapters
A completely assembled hose barb should be similar in size to the factory vent hoses.
At this point, you’ll want to cut a slice through the factory hoses right under the rattle cap and then insert the barbs in through the hose. You now have push lock fittings. Ensure that the plastic hoses aren’t bent or crimped in any way.
Now, guide the lines far away from areas of the vehicle where heat is produced. You’ll gradually want to start routing them upward ensuring that they don’t sag anywhere along the way.
Going back to the front axle housing, you’ll find your breather hose located at the back of the differential.
Take the hose right off the barb and then detach it from the rear of the shock tower on the driver’s side.
Using your circle-tipped pliers, you’ll clamp onto the vent and try freeing it without causing any damage. Using your pry bar should help with freeing it. If it’s not coming free very easily, try using a little penetrating oil on it before you try prying it free.
After the vent is removed, your modded version of it can be put in. You might find that it’s a fairly tight fit, but you should be able to get it in with a few taps of a hammer.
You’ll now just route the hose in the same way that the factory part was routed. Use some cable ties to lower the chances of any chafing occurring on sharper edges of your vehicle. Ensure that all of the hoses in the manifold of the engine bay are terminated.
Your filter will disassemble in three different pieces, and this will create a splash-proof vent. Both the bottom and top sides of the filter are plastic material, and the middle of it is a bronze material that contains little holes.
Now, twist the base of the filter to the manifold. After that, put some filter element in the base and then just clip the cap in. The disassembly of this isn’t complicated, so it’s good to keep an eye on the condition of your filter, ensuring that it is cleaned when necessary.
That’s about it for the installation of the front breather.
Rear End Vent Breather Installation
You’ll want your rear-end tail light to be removed for this installation. Ensure that you’re aware of where the rear manifold should be placed and that you remember to install the filter. Keep in mind that you shouldn’t have any lines hanging in areas where LED heat sinks are located.
You’ll now want to mark some holes in the sheet metal. After that, get your drill and drill the holes.
At this point, you can put the manifold together. You’ll need to install three o-rings using a 3mm hex key. After that, you’ll install the single push lock hose fitting with your 13mm wrench. Once that’s done, you can now bolt the manifold to the sheet metal on the inner side.
Under the Jeep, you’ll see a triangular-shaped plastic piece that is situated near the bottom side of the body tub corner.
Get a 5/16″ drill bit and then start drilling a hole into the cover.
If you look above the panel, you’ll see around 6″ of expanding foam. With some Jeep models, you might not see this same layer of factory foam in that area.
On the bright side, the foam isn’t too hard to get around. Luckily, the ARB line is pretty rigid, so you don’t have to worry about the 8mm line not being able to pop through the foam.
Slide the hose into the hole that was just drilled and then push it right through the expanding foam. The foam kind of holds the hose in place, so if you ever need to find it again, you’ll know where it is.
Using some compressed air, blow the line while ensuring that there’s no foam getting stuck in there.
You can now make a cut through the hose and then install it into the manifold.
Pop the rear filter in, much in the same way that you did with the front one.
After that, take off the factory vent using your 13mm wrench.
Now, you can install the one that’s ARB-compatible that you previously made.
When you’re running the line, make sure that there isn’t anything sagging. To reduce the chances of any rubbing of the lines, use cable ties. You can now neatly trim the end and then plug right in the fitting located on the axle tube.
ARB differential breather kits are raised up about 15″ on the front side and 16″ on the rear side. The transmission breather will be situated near the same area as before. The transfer case breather will be around 6″ higher than its previous area.